
WiFi Signal Mapping for Home Offices: A Practical Guide That Actually Works
I moved my desk into the spare room two years ago, thinking it’d be great. Better light, door that actually closes, all of that. What I didn’t think about was that the spare room sits directly on the other side of the house from the router, behind two brick interior walls and, for reasons I still don’t fully understand, right next to where all the electrical wiring bunches up. Video calls dropped constantly. Files took forever to sync. I assumed my internet plan was the problem for embarrassingly long before someone finally told me — no, your internet’s fine, your signal just isn’t reaching that room properly.
That’s basically what WiFi signal mapping fixes. Not your internet speed. Where the signal actually goes, room by room, versus where you assume it goes because the little bars on your phone say “good” near the router and you never really check anywhere else.
What Signal Mapping Actually Means
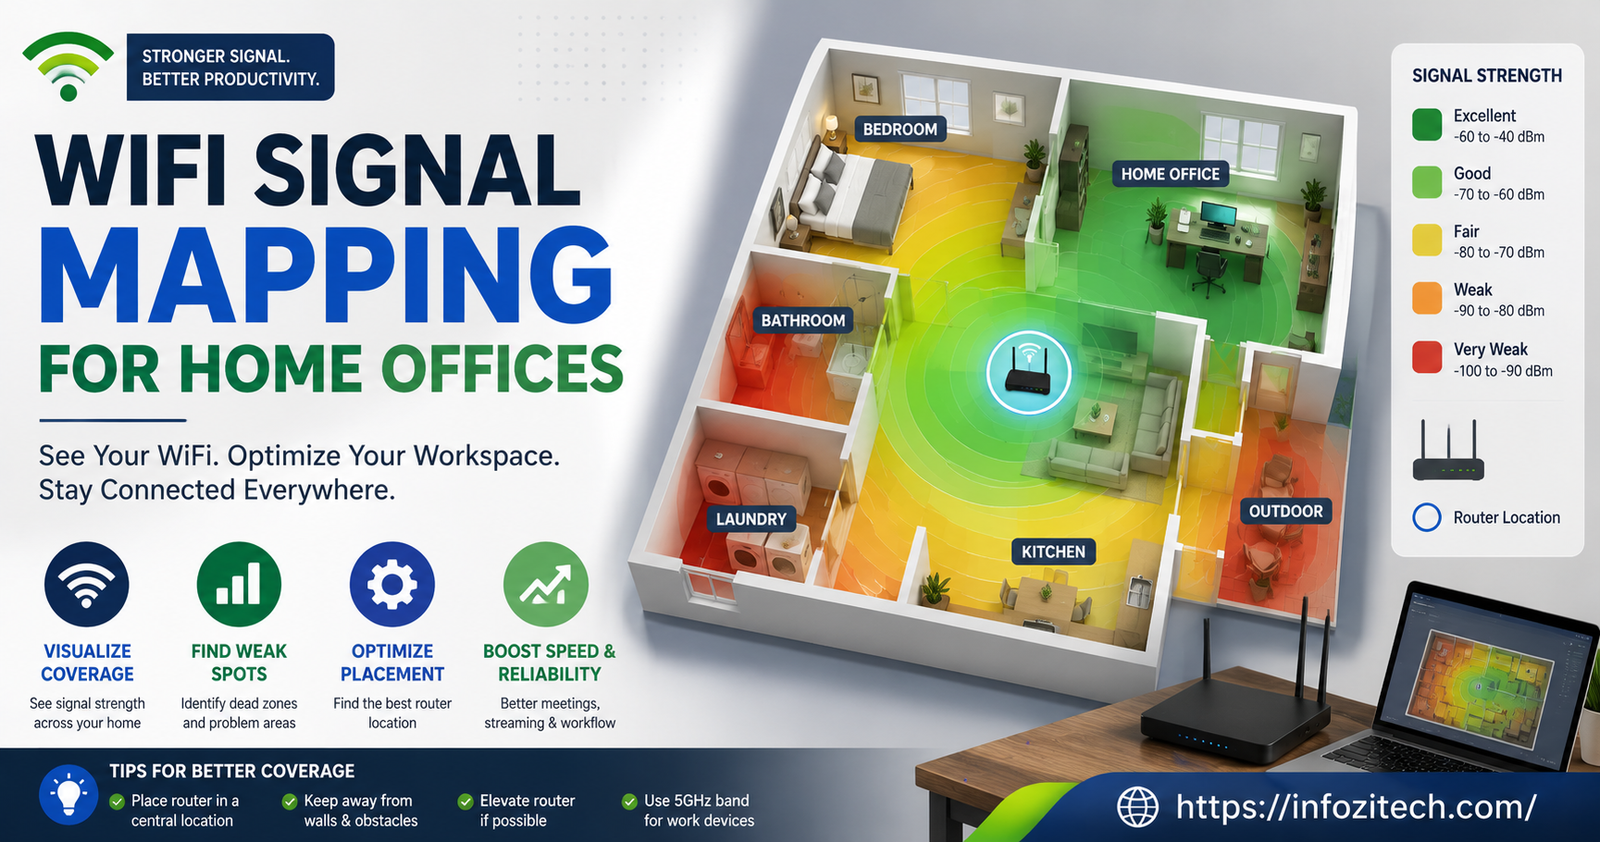
Quick definition before anything else, because “heatmap” sounds fancier than what’s actually happening. You walk around your home with a laptop or phone running some software, and at each spot the software records how strong the WiFi signal is right there. Do that at enough points and the software color-codes it onto a floor plan — green where it’s strong, yellow where it’s okay, red or nothing where it basically isn’t reaching at all. That’s it. That’s the whole idea.
For a home office specifically, this matters more than people expect, because the spots we pick for a desk are so often the worst in the house for signal. Away from the main living area. Behind extra walls. Sometimes in a garage conversion or a basement, both of which are just brutal for WiFi penetration no matter how good your router actually is.
Why This Matters More for a Home Office Than Anywhere Else
In the living room, a weak signal means Netflix buffers for a second, and you complain about it and move on. At a desk where you’re on video calls for hours, or uploading big files, or running anything cloud-based for work, a weak signal is the difference between a normal workday and one where you’re apologizing to a client every fifteen minutes because you froze mid-sentence.
There’s also a thing people don’t think about, which is that video calls specifically punish weak signal way harder than most other stuff you do online. Streaming video has buffering to smooth things out. A live call doesn’t get that luxury — it’s happening in real time, so any dip shows up immediately as a frozen frame or garbled audio, and that’s exactly the moment your boss asked you something important.
Getting Ready Before You Actually Map Anything
Skip this part, and you’ll end up doing the whole walk twice, which I did, so take the shortcut.
Grab or sketch a rough floor plan of your home. Doesn’t need to be architect-precision; a basic top-down sketch on paper works completely fine for this. Mark where your router sits, and any mesh extenders or access points if you’ve already got those running.
Figure out your actual goal before you start walking around with a laptop. Are you just trying to fix one dead spot at your desk specifically, or do you want a full picture of the whole house? Those are different projects, and it’s worth knowing which one you’re actually doing before you start, because the full-house version takes a lot longer.
And do this at a normal time of day, not 3 am when literally nobody else in the house is using anything. WiFi congestion from other devices is part of the real picture, and testing in an artificially quiet moment kind of defeats the purpose of the exercise.
Tools for Mapping a Home Office
NetSpot
Probably the most recommended tool for exactly this use case: home offices and smaller setups rather than giant enterprise buildings. You upload your floor plan, mark your starting position, and walk through your space while it quietly records signal strength as you go. The result is a proper color-coded map, plus it’ll flag things like channel overlap and signal-to-noise ratio if you want to go a level deeper than just “is it strong here or not.” Free version covers what most home offices actually need. Works on Windows and Mac.
Ekahau Heatmapper
This one leans toward simplicity almost to a fault, in a good way for a first-timer. Installs in about a minute, and the visualization is genuinely nice to look at — proper vibrant color gradients instead of the slightly clinical look some competing tools have. It’s a fine starting point if you just want a quick answer and don’t need advanced diagnostics layered on top.
Acrylic Wi-Fi Home
Free specifically for personal, non-commercial use, which covers basically every home office reading this. Similar workflow to the others — load a plan, walk the space, get a heatmap back. Acrylic’s paid tiers go a lot further for actual IT professionals, but the free home version is enough for figuring out why your desk corner is a dead zone.
Your Router or Mesh App’s Built-In Mapping
Worth checking before downloading anything else at all. A lot of mesh systems now build some version of coverage mapping right into their own app — not always a full walk-through heatmap, but often enough of a signal readout per room to spot an obvious problem without a third-party tool at all. Check your app before assuming you need extra software; seriously, sometimes the answer’s already sitting there.
Phone-Based WiFi Analyzer Apps
Less precise than the desktop tools above, but genuinely useful for a fast gut-check. These show you signal strength in real numbers as you walk from room to room, plus which channels nearby networks are using, which matters a lot more in denser apartment buildings than most people realize. Not a full mapping solution on their own, but a decent first pass before committing to a proper survey.
Actually Doing the Walk
Start right next to the router and work outward toward your office, taking a reading every few steps or every room, whichever your tool asks for. Don’t rush this part — I rushed my first attempt and ended up with gaps in the data that made the final map basically useless in a couple of rooms.
Hold the laptop or phone the way you’d normally use it, not pressed against your body or shoved in a bag, since that changes the reading in ways that don’t reflect real conditions.
Do a second pass at your actual desk specifically, several readings right where you sit, not just wherever you happened to walk through on the general sweep. That spot matters more than any other single point in the whole house for this particular project.
Reading the Map Once You Have It
Green usually means strong, reliable, no real concern. Yellow is workable, but you’ll notice it under load — bigger downloads, video calls with screen share, that kind of thing. Red or blank means the signal basically isn’t reaching there in any meaningful way, full stop.
If your desk lands in yellow or worse, that’s your actual answer, not a guess anymore. You now know for certain it’s not your internet plan, not your imagination, not “just a bad day” — it’s a physical distance and material problem between your router and that specific spot.
What to Actually Do With That Information
Reposition Before You Buy Anything
Cheapest fix by far, and the one people skip because it feels too simple to actually work. Sometimes moving the router even a few feet, or getting it up off the floor onto a shelf, makes a real difference. Routers hate being tucked in cabinets or behind the TV, which is exactly where people put them for looks.
Add a Mesh Node or Extender Near the Office
If the map shows a clear falloff specifically on the way to your office, and moving the router isn’t realistic because, say, that’s also where your internet line comes into the house, a mesh node placed partway between the router and your desk usually solves it. Aim for a spot where the existing signal is still yellow, not already red — extending from a dead zone just extends the dead zone.
Switch to 5GHz or Even a Wired Connection at the Desk
WiFi mapping sometimes reveals that the honest fix isn’t more WiFi at all. If your desk is close enough to run an Ethernet cable, even a long one tucked along a baseboard, that solves the whole conversation instantly, and it’s not remotely as ugly as people assume once it’s actually in place.
Re-Map After Any Change You Make
This is the step almost everyone skips, and it’s the one that actually confirms whether anything worked. Move the router, add a node, whatever you did — walk the space again afterward. Sometimes a fix that felt obvious barely moves the numbers, and you’d never know that without checking again properly.
A Few Things That Trip People Up
Interference isn’t only about walls. Microwaves, some baby monitors, even certain LED light fixtures can quietly mess with the 2.4GHz band specifically, and none of that shows up on a floor plan unless you already know to look for it.
Signal strength and actual speed aren’t the same measurement, worth remembering. A strong signal on a congested channel can still feel slow, so if your map looks great everywhere but the office still feels sluggish under real load, channel congestion is probably the next thing worth checking rather than assuming the whole map was wrong somehow.
And don’t map once and assume it’s permanent. Furniture moves, new appliances get added, neighbors change their own network setup and end up on the same channel as you without either of you knowing. A yearly re-check, or definitely one after any layout change, keeps the map honest instead of just being a snapshot from whenever you happened to do it once.
Wrapping This Up
My spare-room office ended up fine in the end, for what it’s worth. One mesh node in the hallway between it and the living room, plus moving the router off the floor and out of the cabinet it was hiding in. Took maybe forty minutes total once I actually knew where the problem was, instead of the months I spent before that just assuming my internet provider was to blame for something that had nothing to do with them. Map it properly first. The fix, once you actually know what you’re fixing, is almost always smaller than you expect.








4 thoughts on “WiFi Signal Mapping for Home Offices: A Practical Guide That Actually Works”